Companion Vet Pre-Installation Requirements
Please verify all sections to verify your office meets the requirements for installation
VETSMART™ X-Ray System Layout
VetSmart System PreInstallation, Installation, and Service Manual
OUTLETS & DATA/NETWORK ACCESS PORTS
Electrical Power Outlets:
VETSMART X-Ray Unit - 220V, 60Hz, 30amp GFCI dedicated grounded outlet
PC Equipment - 120V, 60Hz, 15amp standard grounded outlet
Data/Network Access Ports:
X-Ray Room - Local network Switch/Router - 1GBps data access port minimum (Cat 5e or better). Static IP address required to be configured on PC at time of install by IT Personnel
Internet Speed (ISP) requirement: 10Mbps or greater
*This port is to be near the PC (computer), not x-ray unit
Ensure Port 1433 is closed at the router level within your network. See security guide
*network connection must be live and connected to your office network
X-RAY UNIT DIMENSIONS
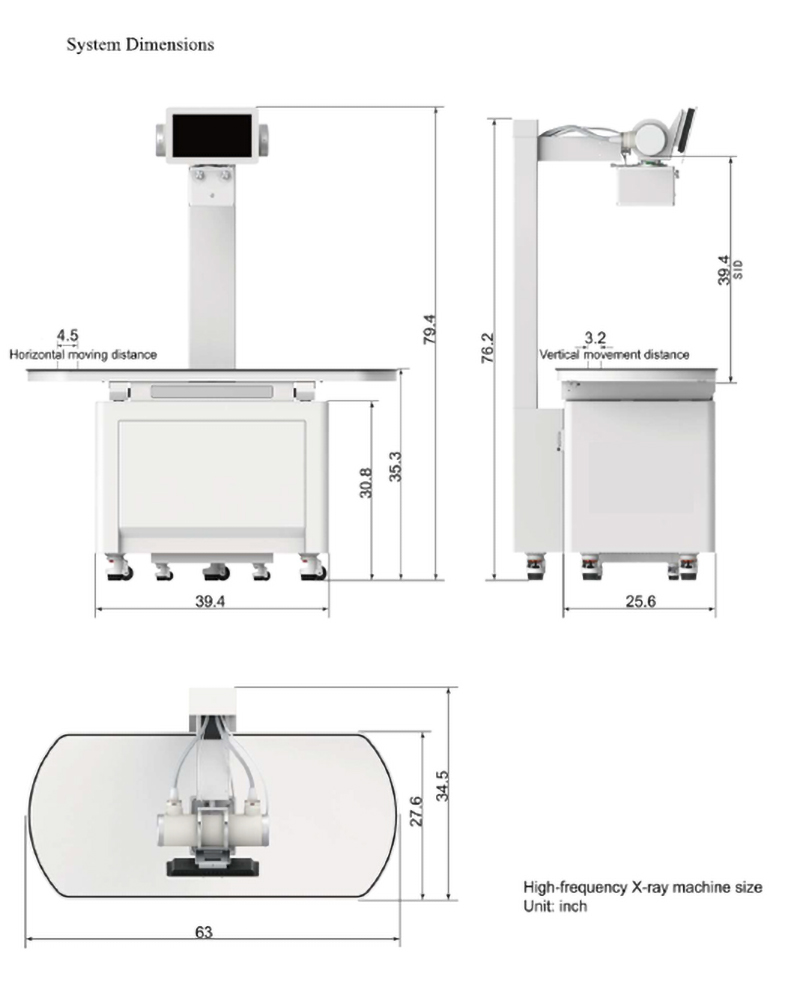
(click image for larger view)
EXTRA EQUIPMENT
X-Ray Room PC - Does not come with a stand, table, or anything to place it on, you are required to; have available counter space, a laptop style wall mount pre-assembled, or a laptop stand (available at your local computer store), prior to installation
*Note: the acquire pc must reside within your X-Ray room, and should be no longer than 8ft away from X-Ray unit. Cables may be run from the PC to the X-Ray unit.
Space is required for the included PC:
PC Tower Dimensions: 11.42” x 3.65” x 11.5” (29cm x 9.26cm x 29.2cm)
Monitor base/stand Dimension: 11.5 (width)"x8.85 (depth)" - Also Vesa-mount compatible
DEDICATED TRAINING TIME
There are two included training sessions.
1hr-1.5hrs Taking of X-rays and Software Basics
In this training session; will review the taking of x-rays, movement of the panel, special positioning, and basic software techniques required to search and pull up patients, burn cds, print, etc.
*This training will take place the morning after the installer assembles the system (2nd day), before patients arrive is recommended
0.5hr-1hr Advanced Viewer Techniques
In this training session; will review advanced image techniques such as changing image contrast, placing annotations (measurements), and other image manipulation tools
*It is highly recommended to schedule patients with potential x-rays during office hours of the 2nd day. The installer will monitor during this time to ensure everyone is comfortable using the system to it's fullest
CURRENT EQUIPMENT
Any current equipment such as old film developers, or anything else that is consuming the space in which the x-ray equipment will be placed, needs to be cleared out prior to installer arrival
*Note, if you have purchased a retro-fit system, this will be taken apart and fitted to the new system by the installer, so you may leave it fully assembled and in place
STATE REQUIREMENTS
NOTE: YOU MUST CONTACT THE RADIOLOGICAL HEALTH/SAFETY AGENCY FOR YOUR STATE PRIOR TO INSTALLATION OR REMOVAL OF RADIATION EMITTING EQUIPMENT. 20/20 IMAGING WILL NOT BE HELD RESPONSIBLE FOR INSTALLATIONS PERFORMED IN VIOLATION OF STATE LAW.